Generator Install Timeline: Key Factors Affecting Duration
How Long Does In-Home Generator Installation Take? Complete Timeline and Process Explained
Getting an in-home standby generator set up involves two timelines running side-by-side: the actual installation day work and the complete project timeline, which includes everything from initial assessments and permits to fuel hookups and final inspections. This guide breaks down both timelines clearly, giving you realistic timeframes for each stage so you can plan around any disruptions, budget effectively, and know when to expect your backup power. You’ll learn about the three main phases of installation, a step-by-step breakdown of how long each part takes, the key factors that can speed things up or slow them down, and what to expect on the big installation day. We also tailor expectations for the CSRA region—Augusta, Evans, Martinez, and Grovetown—and explain how a local provider can help speed up permitting and inspections. Throughout, we naturally weave in phrases like “how long does in-home generator installation take,” “generator permit duration Georgia,” and “automatic transfer switch installation time” to provide quick answers and practical planning advice.
What Are the Main Phases of In-Home Generator Installation?
The entire in-home generator installation project is neatly divided into three primary phases: pre-installation planning, the actual physical installation day(s), and post-installation commissioning and inspection. These phases collectively determine the total project duration and how much it impacts your daily life. Pre-installation is all about getting ready: site assessment, calculating your power needs, planning your fuel source, and submitting permit applications so everything else flows smoothly. Installation day is the high-activity window where most coordination happens, covering pad work, generator placement, wiring the automatic transfer switch (ATS), fuel connections, and initial startup tests. Post-installation involves the final checks: commissioning the system, programming the ATS, getting the final inspection, and a walkthrough with you to hand over operation and maintenance guidance. Understanding these phases helps you schedule around potential outages and coordinate with other professionals like gas contractors or city inspectors.
Dr. Electric CSRA acts as your local coordinator throughout these phases for CSRA homeowners, managing the electrical work, coordinating permits, and scheduling multi-trade tasks to make the process as seamless as possible. Their local knowledge of the authorities having jurisdiction and typical inspection timelines helps shorten the time from permit to completion for many projects. If you prefer expert coordination, just mention your municipality when you book a site visit so we can identify any local scheduling constraints early on.
What Happens During the Pre-Installation Phase?

Pre-installation is the crucial planning and approvals stage. During this phase, an installer will visit your home to conduct a site assessment, perform a load calculation to determine the right generator size, confirm your fuel source options, and prepare the necessary permit packages for your local authority having jurisdiction. The load calculation is key because it dictates the generator’s size and the ATS specifications, which directly impact how complex the electrical panel tie-in will be and what size conduit is needed. Your fuel choice—natural gas, propane, or diesel—determines whether you’ll need to coordinate with the gas utility or schedule propane line installation, and this often influences permit and utility lead times. Your role during this phase is to help by clearing the proposed pad area and ensuring easy access for the assessment; these simple preparations can significantly reduce delays and speed up your move into the installation window.
How Long Does the Physical Installation Day Take?
Physical installation day is when our crews get to work, coordinating site prep, installing the pad or pad-set, placing the generator, wiring the ATS, and making fuel line connections, followed by initial startup and safety checks. For a straightforward installation with a ready pad and no panel upgrade needed, expect a single full workday, typically 6–10 hours. More complex jobs involving trenching, panel upgrades, or extensive fuel routing might extend to two or even three days. The coordination between electricians, gas/plumbing contractors, and concrete crews affects the pace—efficient teams can stage concurrent tasks to minimize the total calendar days. Clear staging and access planning during the pre-installation phase usually mean less time on-site and less disruption for you.
What Is Involved in the Post-Installation Phase?
The post-installation phase covers commissioning, system programming, final inspections, and handing over all the necessary documentation to you. This ensures your system is safe, meets all code requirements, and is ready for automatic operation. Commissioning includes programming the ATS, running test cycles under load, and verifying voltage and frequency regulation. Inspectors then come to verify bonding, grounding, fuel connections, and overall electrical compliance. Once the inspections are passed, we’ll provide a homeowner walkthrough and a maintenance plan, and complete any warranty or service activation paperwork. Scheduling inspections can add several days to a week to the calendar, but experienced local contractors often pre-book these to minimize any idle wait time.
How Long Does Each Step of the Generator Installation Process Take?
This section breaks down the project into specific steps—consultation, permitting, sizing, site prep, physical install, electrical integration, outage time, and testing—and provides realistic duration ranges so you can map out your project timeline. Each step has dependencies: permits rely on municipal review cycles, fuel work depends on utility availability, and electrical integration is tied to your panel’s condition. Below is a table that summarizes typical durations and includes notes to help you compare phases at a glance.
This table summarizes each major installation step, typical duration ranges, and key dependencies.
How Long Is the Initial Consultation and Site Assessment?
An on-site initial consultation typically lasts about 60–120 minutes. During this time, an electrician will perform a load calculation, sketch out placement options, evaluate access for delivery and lifting equipment, and document your electrical panel’s capacity. After the visit, you can expect a written estimate within 2–7 business days that details the recommended generator size, suggested fuel source, ATS requirements, and permit needs. This assessment phase is crucial because accurate measurements and early identification of potential panel upgrades or fuel routing issues prevent surprises during installation. Having your scheduling flexibility and preparedness ready—like providing recent electrical plans or homeowner notes—can shorten follow-up time and speed up permit submission.
Dr. Electric CSRA offers site assessments that include these same core elements—load calculation, placement options, and permit planning—and we consolidate those findings into a written proposal so you know the expected timelines and costs before you commit.
What Is the Typical Timeline for Permitting and Approvals in the CSRA Region?
Permitting and approvals in the CSRA region typically range from one to four weeks, depending on the specific municipality, whether multiple permits (electrical, mechanical, building) are required, and how complete your submission is. Some local authorities schedule inspections weekly, while others have multi-week backlogs during peak seasons. Missing paperwork or incorrect drawings are common reasons for delays. To help speed up approvals, make sure to provide full documentation at submission, use local-standard drawings, and work with a contractor who is familiar with CSRA AHJs. Early dialogue with the authority having jurisdiction can reduce rework and shorten permit cycles.
This local knowledge of municipal patterns is one reason why using a CSRA-based installer can make your timeline more predictable: we know which jurisdictions tend to have longer review periods and prepare submissions accordingly.
How Long Does Generator Sizing and Fuel Line Preparation Take?
Sizing requires a precise load calculation and selecting a generator rated to handle your essential and optional circuits. This process typically takes 1–3 business days to finalize once measurements and panel data are available. The timing for fuel line preparation depends heavily on the fuel type: propane line or tank setup can often be scheduled within days, while natural gas hookups frequently depend on utility crew availability and may add one to several weeks for scheduling and inspection. Diesel systems require planning for tank and line installation, which can add several days. Coordinating with your chosen fuel contractor early in the planning phase reduces the chance of fuel-related delays.
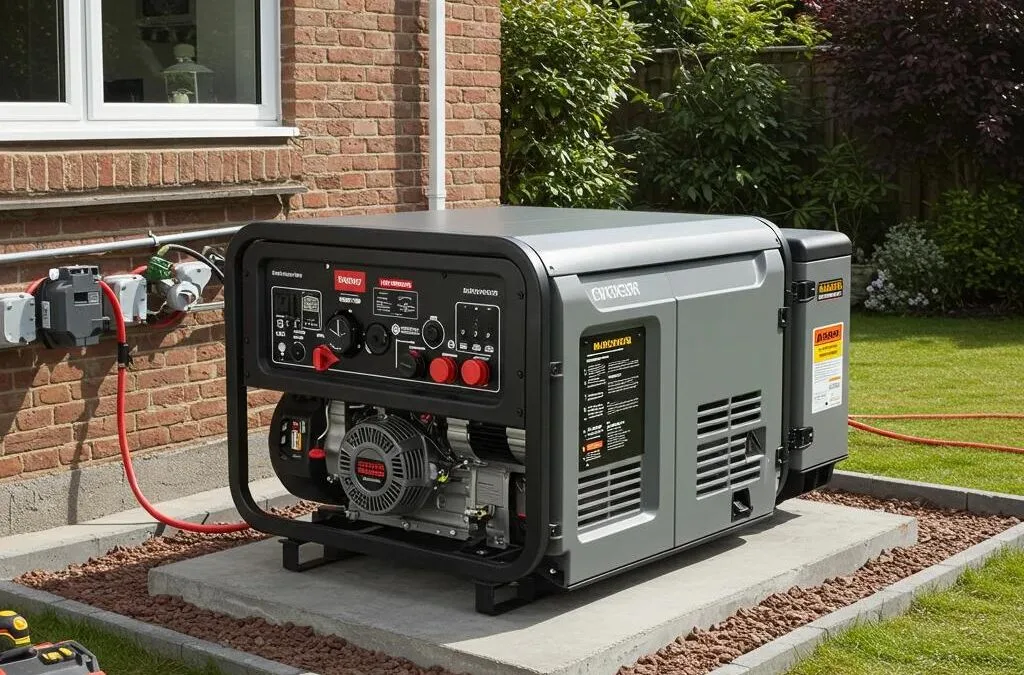
How Many Days Are Needed for Site Preparation and Generator Placement?
Site preparation includes work like concrete pad construction, leveling, compaction, and installing conduit or trenching. A poured concrete pad typically requires 3–7 days, including cure time, while a prefabricated pad can be set in a single day if access is good. Trenching for conduit and fuel lines generally takes a day or two, depending on the distance and soil conditions; poor access or rock excavation can add days. When heavy equipment or cranes are necessary for placement on constrained lots, scheduling that equipment influences the calendar and may add an extra day for mobilization. Good pre-planning of access routes and temporary protection for landscaping can shorten the actual on-site work.
How Long Does Electrical System Integration and Transfer Switch Installation Take?
Installing the automatic transfer switch and integrating the generator into your home’s electrical panel is normally accomplished within a 3–8 hour window for straightforward panel tie-ins, performed by licensed electricians during a single-day service call. If your existing panel requires an upgrade, service entrance work or subpanel installation can add a day or two, plus permit time. ATS programming, bonding, grounding, and protective device coordination all happen during this window, followed by functional testing. If additional load management or selective load transfer is needed, expect additional engineering and longer installation windows.
The proper installation, commissioning, operation, and maintenance of an Automatic Transfer Switch (ATS) are critical for the reliable functioning of a backup power system.
Automatic Transfer Switch Installation, Operation, and Maintenance Guide
Proper installation, commissioning, operation, maintenance & troubleshooting procedure have been discussed thoroughly in this project report. A large number of real pictures have been shown to make the report more useful to all. It has been tried to provide a good understanding of the ideas about proper operation, maintenance & troubleshooting of auto transfer switch.
Performance evaluation and operation of Auto Load transfer switch, D Paul, 2013
What Is the Expected Duration of Power Outage During Installation?
The final tie-in and switchover steps, which require interrupting your home’s service, typically cause short planned outages, often in the 1–6 hour range for standard installations. Longer outages—up to a full day—can occur if panel upgrades, re-wiring, or major reconfiguration are needed. By staging work to pre-wire the ATS and complete panel changes before the final meter or service disconnect, we can reduce the outage window. Communicating the planned outage window in advance and helping you prepare temporary power or refrigeration measures helps you manage this short disruption.
How Long Does System Testing, Programming, and Final Inspection Usually Take?
System testing and programming usually take 2–6 hours on-site and include ATS logic checks, exercise runs under load, and verifying automatic start/stop and transfer functions. Scheduling a final inspection depends on municipal availability—inspector visits can be as quick as the next day in some jurisdictions or take up to two weeks in busier periods. Inspectors commonly check grounding, bonding, fuel line integrity, and electrical connections; any required corrections will extend the time to completion. Once inspections pass and documentation is completed, the system is operational, and warranty/maintenance handoff is finalized.
What Factors Influence the Duration of Home Generator Installation?
Several variables influence how long an installation takes: the type and size of the generator, the complexity of your electrical system, permit and inspector schedules, site access and readiness, and weather or seasonal workload. Each factor can change the calendar trade-offs: a simple change in fuel type can shift timelines by weeks, while easy access and a prefab pad can reduce on-site time to a single day. Understanding how these factors interact helps you prioritize actions—like securing permits early or scheduling fuel deliveries—to minimize the total project duration.
Below is a compact table that maps main factors to their time impact and provides example days/hours for realistic planning.
How Does Generator Type and Size Affect Installation Time?
Smaller whole-house or subpanel-focused generators generally require less time to place and wire. In contrast, high-capacity standby systems often need heavier foundations, larger conduits, and additional mechanical or structural support—which increases both on-site hours and permit scrutiny. Fuel type also interacts with size: larger natural gas generators might require utility upgrades, while large propane units need adequate tank sizing and siting. Choosing an appropriately sized unit based on a professional load calculation prevents later rework and shortens the overall timeline.
How Does Electrical System Complexity Impact Installation Duration?
Older or undersized electrical panels commonly require upgrades that extend project time due to additional wiring, breaker replacements, and sometimes service disconnect coordination with the utility. Custom load-management solutions, integrated transfer schemes, or multi-generator systems require additional engineering and testing time. When complexity is identified early during the consultation, contractors can plan panel work around permitting and inspector timing to avoid surprise delays.
What Role Do Permits and Inspection Schedules Play in Timing?
Permits and inspections are frequently the largest source of calendar delays because they depend on municipal staffing cycles and the completeness of submittals. Incomplete permit packages lead to resubmission and review cycles that can add weeks. Experienced local contractors prepare full documentation and schedule inspections proactively to reduce idle waiting. When possible, fast-tracking or pre-approval conversations with AHJs can shorten turnaround times, especially during busy seasons.
How Do Site Accessibility and Weather Conditions Affect Installation Speed?
Limited access—such as narrow driveways, steep lots, or heavily landscaped yards—can require special equipment or manual placement, often adding days to placement and pad work. Weather affects excavation, concrete cure times, and the safe operation of lifting equipment; heavy rain or frozen ground can pause work entirely. Scheduling installations during historically drier periods and planning temporary protective surfaces for landscaping reduces the risk of weather-related delays.
How Long Does Standby Generator Installation Typically Take in the CSRA Region?
Local CSRA timelines reflect municipal permitting pace, utility coordination patterns, and typical weather windows, so homeowners in Augusta, Evans, Martinez, and Grovetown usually see project durations fall within predictable ranges. Typical local variables include weekly inspection cycles in some municipalities, utility scheduling for natural gas tie-ins, and seasonal workload spikes that can lengthen permit and inspection times. The table below provides localized averages and common local delays to help set expectations for homeowners in the CSRA area.
This table provides city-level typical timelines and common local delays for CSRA communities.
How Does Dr. Electric CSRA Expedite the Installation Process?
Dr. Electric CSRA leverages our local permitting familiarity, proactive permit submission, and coordinated multi-trade scheduling to compress common delays in the CSRA region. By preparing complete documentation and aligning electrician, gas/plumbing, and concrete schedules before permit issuance, we reduce idle time between steps. We also monitor inspection calendars and can prioritize scheduling for urgent or emergency installs where permitted, shortening overall calendar days. For homeowners seeking faster assessments or expedited scheduling, calling us can start the coordination process.
What Emergency Services Does Dr. Electric CSRA Offer During Power Outages?
Dr. Electric CSRA provides 24/7 emergency electrical services and rapid diagnostics to stabilize electrical issues that arise during outages. We can also implement temporary power measures while permanent backup systems are scheduled. Rapid response limits downtime and protects critical circuits until standby generator installations are completed. Our ability to perform emergency diagnostics, coordinate temporary solutions, and funnel urgent installations into a prioritized schedule helps homeowners reduce outage risk while transitioning to permanent standby power.
What Should Homeowners Expect on Installation Day?
Installation day is the most visible phase: our crews arrive, protect your landscaping, perform final site prep, place the generator, complete conduit and fuel work, wire the ATS, and run initial tests. You should expect clear communication about our arrival time, a short planned outage during the final tie-in, and a crew that follows strict safety protocols to protect your property. Typical on-site timelines range from a single long day for simple installs to multiple days when pad work, trenching, or panel upgrades are required. Preparing the site and answering pre-visit questions helps reduce surprises and keeps our crews focused on completing work efficiently.
How Is the Site Prepared for Generator Placement?
Site preparation includes clearing the pad area, ensuring the ground is level, verifying drainage, and protecting nearby landscaping with temporary mats or plywood for equipment access. Concrete pads require forming, pouring, and curing; when a prefab pad is used, our crews ensure precise leveling and anchoring. We check for underground utilities before trenching and confirm fuel routing paths. A well-prepared site helps avoid equipment rework and reduces the chance of unexpected delays.
What Happens During Generator Placement and Electrical Hookup?
Placement begins with setting the generator on the pad using a crane or forklift if needed, followed by anchoring and weatherproofing. Electricians then install conduit, pull conductors, mount the ATS, and make panel connections according to code. Fuel contractors complete piping and pressure testing for gas or secure propane tank connections. After mechanical and electrical hookups, crews perform functional tests to verify engine start, transfer switch operation, and proper load handling. This sequence ensures the generator operates reliably and safely once handed over to you.
How Long Will the Home Be Without Power During Installation?
Power interruptions are usually limited to the final transfer and tie-in steps and commonly last between one and six hours for straightforward installs. If panel upgrades or complex rewiring are necessary, the outage can extend to a full day. By staging tasks ahead of the outage—such as pre-wiring the ATS and completing panel changes—we significantly shorten the blackout window. Homeowner preparedness, including securing sensitive electronics and planning for refrigeration, helps mitigate the impact of this short planned outage.
What Safety Measures Are Taken During Installation?
Professional installers follow strict safety protocols: lockout/tagout procedures during panel work, pressure testing for gas lines, bonding and grounding verification, and the use of personal protective equipment for all crew members. Inspectors verify that fuel and electrical connections meet code and that site access is safe for equipment. These measures prevent shocks, gas leaks, and fire hazards, ensuring a safe handoff to you once the system is commissioned and inspected.
- Lockout/Tagout Verification: Ensures circuits are de-energized before work begins.
- Fuel Line Leak Testing: Confirms gas/propane connections are secure and leak-free.
- Grounding and Bonding Confirmation: Verifies proper earthing for system safety.
Following these checks, the system enters the testing phase to confirm safe automatic operation.
Why Choose Dr. Electric CSRA for Your In-Home Generator Installation?
Selecting a local, experienced electrical services provider reduces scheduling friction and increases the odds of a smooth, timely installation. Dr. Electric CSRA positions itself as a CSRA-focused electrical contractor offering comprehensive electrical services, emergency response, and local permitting knowledge that collectively support faster project completion. Our stated UVPs include licensed and certified electricians, a focus on safety and reliability, an emphasis on customer satisfaction, and local 24/7 emergency services that are particularly useful during outage-prone seasons. Choosing a contractor familiar with local utility and inspection patterns reduces surprises and keeps the schedule moving.
What Expertise and Experience Does Dr. Electric CSRA Bring?
Dr. Electric CSRA is described as a premier electrical services provider in the CSRA region, boasting licensed and certified electricians and broad experience serving residential, commercial, and industrial clients. That local expertise helps us anticipate municipal requirements and plan installations with realistic timelines. For homeowners, this reduces the risk of incomplete permit submissions or poor sequencing that can lengthen projects. Working with a provider who understands both the electrical and permitting landscapes improves predictability and outcome quality.
How Does Dr. Electric CSRA Ensure Safety and Reliability?
Our approach emphasizes commissioning, adherence to local codes, thorough testing, and maintenance plan handoffs to ensure long-term reliability. Safety measures include professional ATS programming, bonding and grounding verification, and coordination with fuel contractors for proper pressure and leak testing. By treating commissioning and documentation as integral deliverables, we help homeowners maintain safe and reliable backup power for years after installation.
What Customer Satisfaction and Local Service Benefits Are Offered?
Local service benefits include faster response times, familiarity with municipal inspectors, and targeted scheduling to reduce idle waiting between trades. Dr. Electric CSRA emphasizes customer communication and quick emergency response within the CSRA region, which improves homeowner confidence and reduces downtime during severe weather events. These local strengths translate into clearer timelines and fewer administrative delays.
Are Financing and Incentives Available for Generator Installation?
Financing and incentive options for generator installs vary over time and by provider; homeowners are encouraged to contact Dr. Electric CSRA directly to ask about current financing arrangements or local incentives. A short conversation during the consultation phase will clarify available options and how they might affect scheduling or project phasing. Asking early about financing helps align installation timing with budgetary planning.
What Are Common Questions About Generator Installation Time?
This final section answers concise, snippet-ready questions homeowners frequently ask about installation time, outages, permits, DIY feasibility, ATS install duration, and delay causes. The short answers are focused so you can quickly find practical guidance and next steps to keep your project on track.
How Long Is Power Off During Generator Installation?
Planned power interruptions for final tie-in most commonly last between one and six hours for standard installs; complex rewiring or panel upgrades can extend outages up to a full day. Staging pre-wiring tasks and coordinating trades reduces the outage window. Preparing refrigeration and critical systems in advance minimizes homeowner impact.
Do I Need a Permit for Generator Installation in Georgia?
Yes—permits are typically required in Georgia for electrical and mechanical work associated with standby generators, and the types and processes depend on your local authority having jurisdiction. Typical permits include electrical permits for panel and ATS work, and mechanical or plumbing permits for fuel or gas connections. Contacting the AHJ or working with a local CSRA contractor ensures correct permit submission.
Can Generator Installation Be a DIY Project?
No—professional installation is strongly recommended due to safety, code compliance, and permit requirements; ATS wiring, panel integration, and fuel connections involve significant electrical and gas hazards that require licensed technicians. DIY work risks code violations, failed inspections, and voided warranties. Licensed installers provide the necessary documentation for permits and inspections.
How Long Does It Take to Install an Automatic Transfer Switch?
Installing an ATS itself typically takes several hours to a single day, depending on the complexity of the panel tie-in; if panel upgrades are required, the overall installation expands by one or more days. ATS installation includes wiring, protective device coordination, and programming, followed by functional testing. Early identification of panel capacity reduces surprises during ATS installation.
What Factors Can Cause Delays in Generator Installation?
Common delay causes include permitting backlogs, incomplete paperwork, parts or equipment lead times, weather interfering with pad or trenching work, site access restrictions, and unexpected electrical issues uncovered during pre-installation. To mitigate delays, prepare full documentation, confirm fuel delivery timelines, and choose a local installer experienced with CSRA permit and inspection patterns. For urgent needs or emergency backup, contact Dr. Electric CSRA at 706-305-6563 to discuss expedited assessment and scheduling.
Key delay mitigations include:
- Submit complete permit packages up front to avoid review cycles.
- Pre-book utility and fuel contractor dates so critical-path tasks align.
- Prepare site access to allow equipment entry and reduce staging time.
These steps reduce the chance of multi-week setbacks and keep the installation on a predictable schedule.
Frequently Asked Questions
What are the benefits of hiring a local contractor for generator installation?
Hiring a local contractor, like Dr. Electric CSRA, offers several advantages. Local contractors have a deep understanding of regional permitting processes, utility coordination, and inspection schedules, which can significantly speed up the installation timeline. They are familiar with local codes and regulations, reducing the risk of delays due to compliance issues. Plus, local contractors often provide quicker response times for service and support, ensuring you get timely assistance during outages or emergencies.
What should I do to prepare my home for generator installation?
To get your home ready for generator installation, start by clearing the proposed installation area of any debris or obstacles. Make sure there’s easy access for the installation crew and equipment. It’s also helpful to provide recent electrical plans or notes about your electrical system to the contractor. Additionally, discuss any specific needs or concerns with your installer during the pre-installation phase to ensure a smooth process and minimize potential delays.
How can I ensure my generator installation stays on schedule?
To keep your generator installation on schedule, begin by securing all necessary permits early in the process. Work closely with your contractor to ensure all documentation is complete and submitted promptly. Pre-book utility and fuel contractor dates to align critical tasks. Also, prepare your site for installation by clearing access routes and ensuring any required groundwork is completed ahead of time. Open communication with your contractor throughout the process can also help identify and address potential delays quickly.
What types of generators are available for home installation?
Homeowners can choose from several types of generators for installation, including standby generators, portable generators, and inverter generators. Standby generators are permanently installed and automatically provide power during outages, making them ideal for whole-home backup. Portable generators are versatile and can power specific appliances but require manual setup. Inverter generators are quieter and more fuel-efficient, suitable for sensitive electronics. Your choice depends on your power needs, budget, and installation preferences, so consulting with a professional can help determine the best option.
What maintenance is required after generator installation?
After installation, regular maintenance is essential to ensure your generator operates reliably. This includes routine checks of the oil and coolant levels, battery maintenance, and testing the automatic transfer switch. It’s also important to run the generator periodically to ensure it functions correctly during an outage. Many manufacturers recommend a professional inspection at least once a year to check for any wear and tear, ensuring the system remains compliant with safety standards and operates efficiently when needed.
Are there any incentives or financing options for generator installation?
Many homeowners may qualify for financing options or local incentives for generator installation, which can help offset costs. These options vary by provider and region, so it’s advisable to inquire directly with your contractor about current financing arrangements or available rebates. Some utility companies also offer incentives for energy-efficient installations. Discussing these options during the initial consultation can help align your installation with your budget and financial planning.